Quickstart
After working through this guide, you will have learned:
- the structure of a form
- creating a form using the API
- rendering a form
- adding validation rules
- invoking actions after the form is finished
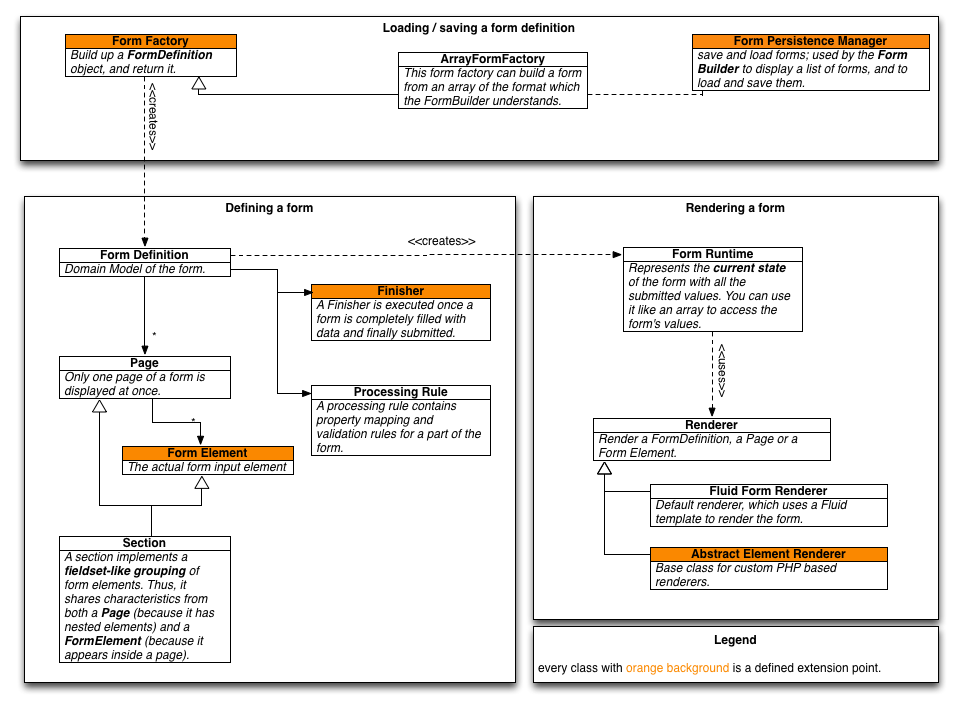
API Overview
The image below shows the high-level API overview of the this package.
First, we will dive into the API part defining a form, and then go over to rendering a form. In later chapters, we will also show how loading / saving a form definition works.
Anatomy of a Form
A form is described by the so-called FormDefinition, which is a container object
for the form that consists of one or more Pages in which the actual FormElements are located.
As an example, let’s take a basic contact form with the following structure:
- Contact Form (Form)
- Page 01 (Page)
- Name (Single-line Text)
- Email (Single-line Text)
- Message (Multi-line Text)
Our form just has a single page that contains three input fields: Name, Email and Message.
Note
Every form needs to have at least one page.
Further Information
In-depth information about the form structure can be found in the FormDefinition API Documentation.
Create your first form
Now, let’s try to create the basic contact form from above. For this we need to implement a so-called FormFactory, which is responsible for creating the form.
Note
The package comes with a ready-to-use factory for building forms based on YAML files describing the forms. See Configuring form rendering with YAML for details.
If you want to build a form with PHP, the skeleton for building a form looks as follows:
namespace Your\Package;

use TYPO3\Flow\Annotations as Flow;
use TYPO3\Form\Core\Model\FormDefinition;

class QuickstartFactory extends \TYPO3\Form\Factory\AbstractFormFactory {

        /**
         * @param array $factorySpecificConfiguration
         * @param string $presetName
         * @return \TYPO3\Form\Core\Model\FormDefinition
         */
        public function build(array $factorySpecificConfiguration, $presetName) {
                $formConfiguration = $this->getPresetConfiguration($presetName);
                $form = new FormDefinition('yourFormIdentifier', $formConfiguration);
                // Now, build your form here
                return $form;
        }
}
As you can see there is the build() method that you have to implement; and this method
needs to return the FormDefinition.
Lets add the one page and input fields for name, email and message of our contact form:
public function build(array $factorySpecificConfiguration, $presetName) {
        $formConfiguration = $this->getPresetConfiguration($presetName);
        $form = new FormDefinition('contactForm', $formConfiguration);

        $page1 = $form->createPage('page1');

        $name = $page1->createElement('name', 'TYPO3.Form:SingleLineText');
        $name->setLabel('Name');

        $email = $page1->createElement('email', 'TYPO3.Form:SingleLineText');
        $email->setLabel('Email');

        $comments = $page1->createElement('message', 'TYPO3.Form:MultiLineText');
        $comments->setLabel('Message');

        return $form;
}
You see that we used the API method createPage($identifier), which creates a new page inside
the form object and returns it for further use. Then, we used createElement($identifier, $type)
to create the form elements and set some options on them.
The $identifier is used to identify a form element, thus it needs to be unique
across the whole form. $type references an Element Type.
Note
By default the $identifier is part of the id attribute of the rendered Form Element so it should be lowerCamelCased and must not contain special characters.
Tip
As you will learn in the next guide, you can define your own Element Types easily.
The element types referenced above (TYPO3.Form:SingleLineText and TYPO3.Form:MultiLineText)
are just element types which are delivered by default by the framework.
Render a form
Now that we have created the first FormDefinition how can we display the actual form? That is really easy with the provided form:render ViewHelper:
{namespace form=TYPO3\Form\ViewHelpers}
<form:render factoryClass="Your\Package\YourFactory" />
If you put that snippet in your Fluid template and replace YourPackage with your package namespace and YourFactory with the class name of the previously generated form factory, you should see a form consisting of the three text fields and a submit button.
But as you can see, none of the fields are required and the email address is not verified. So let’s add some basic validation rules:
Validation
Every FormElement implements the FormElementInterface which provides a convenient way to work with TYPO3 Flow validators:
$name->addValidator(new \TYPO3\Flow\Validation\Validator\NotEmptyValidator());

$email->addValidator(new \TYPO3\Flow\Validation\Validator\NotEmptyValidator());
$email->addValidator(new \TYPO3\Flow\Validation\Validator\EmailAddressValidator());

$comments->addValidator(new \TYPO3\Flow\Validation\Validator\NotEmptyValidator());
$comments->addValidator(new \TYPO3\Flow\Validation\Validator\StringLengthValidator(array('minimum' => 3)));
With the addValidator($validator) method you can attach one or more validators to a form element.
If you save the changes and reload the page where you embedded the form, you can see that
all text fields are required now, that the email address is syntactically verified and that
you need to write a message of at least 3 characters. If you try to submit the form with
invalid data, validation errors are displayed next to each erroneous field.
If you do enter name, a valid email address and a message you can submit the form - and see a blank page. That’s where so called Finishers come into play.
Finishers
A Finisher is a piece of PHP code that is executed as soon as a form has been successfully submitted (if the last page has been sent and no validation errors occurred).
You can attach multiple finishers to a form.
For this example we might want to send the data to an email address, and we can use the EmailFinisher for that:
$emailFinisher = new \TYPO3\Form\Finishers\EmailFinisher();
$emailFinisher->setOptions(array(
        'templatePathAndFilename' => 'resource://Your.Package/Private/Templates/ContactForm/NotificationEmail.txt',
        'recipientAddress' => 'your@example.com',
        'senderAddress' => 'mailer@example.com',
        'replyToAddress' => '{email}',
        'carbonCopyAddress' => 'copy@example.com',
        'blindCarbonCopyAddress' => 'blindcopy@example.com',
        'subject' => 'Contact Request',
        'format' => \TYPO3\Form\Finishers\EmailFinisher::FORMAT_PLAINTEXT
));
$form->addFinisher($emailFinisher);
And afterwards we want to redirect the user to some confirmation action, thus we add the RedirectFinisher:
$redirectFinisher = new \TYPO3\Form\Finishers\RedirectFinisher();
$redirectFinisher->setOptions(
        array('action' => 'confirmation')
);
$form->addFinisher($redirectFinisher);
Summary
That’s it for the quickstart. The complete code of your form factory should look something like this now:
namespace Your\Package;

use TYPO3\Flow\Annotations as Flow;
use TYPO3\Form\Core\Model\FormDefinition;

/**
 * Flow\Scope("singleton")
 */
class QuickstartFactory extends \TYPO3\Form\Factory\AbstractFormFactory {

        /**
         * @param array $factorySpecificConfiguration
         * @param string $presetName
         * @return \TYPO3\Form\Core\Model\FormDefinition
         */
        public function build(array $factorySpecificConfiguration, $presetName) {
                $formConfiguration = $this->getPresetConfiguration($presetName);
                $form = new FormDefinition('contactForm', $formConfiguration);

                $page1 = $form->createPage('page1');

                $name = $page1->createElement('name', 'TYPO3.Form:SingleLineText');
                $name->setLabel('Name');
                $name->addValidator(new \TYPO3\Flow\Validation\Validator\NotEmptyValidator());

                $email = $page1->createElement('email', 'TYPO3.Form:SingleLineText');
                $email->setLabel('Email');
                $email->addValidator(new \TYPO3\Flow\Validation\Validator\NotEmptyValidator());
                $email->addValidator(new \TYPO3\Flow\Validation\Validator\EmailAddressValidator());

                $comments = $page1->createElement('message', 'TYPO3.Form:MultiLineText');
                $comments->setLabel('Message');
                $comments->addValidator(new \TYPO3\Flow\Validation\Validator\NotEmptyValidator());
                $comments->addValidator(new \TYPO3\Flow\Validation\Validator\StringLengthValidator(array('minimum' => 3)));

                $emailFinisher = new \TYPO3\Form\Finishers\EmailFinisher();
                $emailFinisher->setOptions(array(
                        'templatePathAndFilename' => 'resource://Your.Package/Private/Templates/ContactForm/NotificationEmail.txt',
                        'recipientAddress' => 'your@example.com',
                        'senderAddress' => 'mailer@example.com',
                        'replyToAddress' => '{email}',
                        'carbonCopyAddress' => 'copy@example.com',
                        'blindCarbonCopyAddress' => 'blindcopy@example.com',
                        'subject' => 'Contact Request',
                        'format' => \TYPO3\Form\Finishers\EmailFinisher::FORMAT_PLAINTEXT
                ));
                $form->addFinisher($emailFinisher);

                $redirectFinisher = new \TYPO3\Form\Finishers\RedirectFinisher();
                $redirectFinisher->setOptions(
                        array('action' => 'confirmation')
                );
                $form->addFinisher($redirectFinisher);

                return $form;
        }
}
Next Steps
Now, you know how to build forms using the API. In the next tutorial, you will learn how to adjust the form output and create new form elements – all without programming!
Continue with: Adjusting Form Output